

Overview
Django is a free, open-source Python web framework that encourages rapid development and clean, pragmatic design. In this blog I am going to introduce a step-by-step tutorial of a simple Django project using Python programming language.
Setup
1. Create a python project
- This step is important because you need to create a special environment for the Django project in order for it to work
- run the following commands in your terminal
# create a directory, give it a name and go inside it
mkdir dirName
cd dirName

# create a python project and give it a name and go inside it as well
poetry new django-py
cd django-py

# install poetry and activate the virtual environment
poetry install
poetry shell
- you can now remove the unnecessary files of the python project:
rm -r test django_py
2. After this you are going to have a ready python project, now you need to add django then create the Django project
poetry add django
- now in order to start the project, run this:
django-admin startproject snacks
cd snacks
3. After starting the project you need to run a migration command, which is used in two cases:
- when you start a new project so it creates for you a database to be used in your project:
python manage.py migrate
- The reason we now use (manage.py) is because its is a wrapper around (Django admin), so instead of using (Django admin) we will use manage.py, and the reason is that manage.py takes setting of the project into account.
if I run the following Django command:
django-admin runserver
# you will not get a result because it doesn't know about your project settings.

# use this instead
python manage.py runserver
- when you create or change a model in you application:
python manage.py makemigrations
python manage.py migrate
4. Create a super user, which is going to be the admin of the project
python manage.py createsuperuser
- In this step you provide a username for the admin, an email and a password to be used when deploying your project
5. Create an application
python manage.py startapp my_snacks
6. The setup is now complete, Open VS code to add some changes before creating project features
Project Essential Requirements
After reaching this point, you are going to have two main directories, one for the application you installed, and the other one is the core directory of the Django project.
Core directory content
init file -> defines the directory as a package.
settings module -> where we define our application settings.
urls module -> where we define URLs of our application.
wsgi and asgi modules -> are used for deployment
Applications directory content
admin -> gives us an admin interface for managing our data.
auth -> which is used for authenticating users.
sessions -> a temporary memory on the server for managing users data, we dont use this app, we can delete it.
messages -> used for displaying one time notification to the user.
staticfiles -> for serving static files like images.
In order to start adding features with Django you have to do the following before:
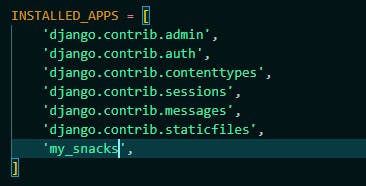
- Assign the installed application in project setting. To do that go to snacks then to settings.py file and scroll down until you see a list of (INSTALLED_APPS), in there you can add the name of your new application as a string.
- Go to my_snacks folder and create a new file called urls.py.
MVT
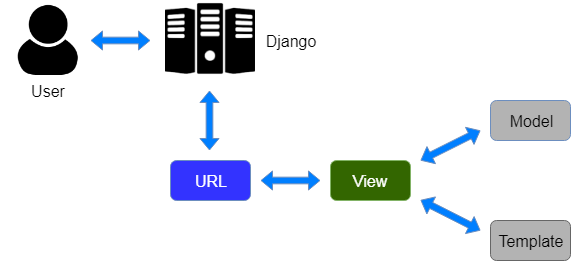
The MVT is an abbreviation for Model View Template and its is defined as a software design pattern which we follow in order to create three important Django components:
Model -> Models handles databases of the project, its known as a data layer which handles data.
View -> Views are request handles, interacting with models, views are used to carry data and render templates.
Template -> Templates are HTML files, they are an interface layer which the user can see and interact with.
a) Now that you know the sequence, you can start building you Models. From application folder (my_snacks), go to models.py. Note that models can be classes, and the naming convention of models are (singular nouns). Here is an example of a model:
# models are imported by default
from django.db import models

class YummySnacks(models.Model):
# Each model is a Python class that subclasses (models.Model).
    # here we used some Field options which are built in with Django, such as Charfield
    name = models.CharField(max_length=255)
    describtion = models.TextField()
    price = models.IntegerField()
    is_cool = models.BooleanField()


    def __str__(self):
        return self.name
- Make admins. Admins are used to:
1. register the model .
2. make a customization of the admin interface.
From the application folder go to admins.py file, and import your models:
from .models import YummySnacks
- There are two ways to register your models using admins:
1. using @admin.register
@admin.register(ModelName)
class AdminYummySnacks(admin.ModelAdmin):
    #customizing
    list_display = ['name', 'price', 'is_yummy']
2. using admin.site.register
admin.site.register(YummySnacks)
Note: Make sure each time you create a new model to run the python manage.py makemigrations command followed by python manage.py migrate in order to be able to run the server.
b) Now after finishing your models you can move to the next component of MVT, which is Views: creating views is very straightforward, you start with importing the base-class view (TemplateView). TemplateView extends the base class to make it also render a template.
from django.views.generic import TemplateView
# we also need to import the models we created
from .models import YummySnacks

class HomeView(TemplateView):
    template_name = 'home.html'
    # here you choose a name for the template you're going to create
- After creating views, you need to make URLs for each one in the application folder, you can do it like this:
from django.urls import path
from .views import HomeView

urlpatterns = [
    path('home', HomeView.as_view(), name='home')
                       ]
# Any arguments passed to as_view() will override attributes set on the class.
# here the name is added for the template, to make the URL path dynamic as possible
# if two applications have the same URL, the name separates them
- now you also want to include a path in the urls.py file of the core directory:
from django.urls import path, include

urlpatterns = [
    path('admin/', admin.site.urls),
    path('', include('my_snacks.urls'))
    # if I created another app, a new path will be added here
]
c) Its time for creating the third MVT component, Templates.
- first, create a folder inside the core directory and name it templates
- inside that folder, create your first HTML file with the same name you selected in the views.py.
- after doing this step, you should go to settings.py file and add the following:

- now you can start adding elements to your HTML file.
Note: Use ancestor template to write your HTML file, using a base HTML file to inherit from to make it more clean and easy.
Django Templating Language Documentation
- You can now run the server to see the updates you made by running the following command:
python manage.py runserver
- Open the link that appears in the terminal and type /admin in the URL to see your models and the admins interface.
- you can add the endpoint you created /home to see the html home page.
User Acceptance Tests
- first you need to import TestCase and reverse function:
Note: Reverse function allows you to retrieve URL details from urls.py.
from django.test import TestCase
from django.urls import reverse
- Here is a test example of how to verify status code:
class SnackTest(TestCase):
    def test_home_page_status_code(self):
        url = reverse('home')
        response = self.client.get(url)
        self.assertEqual(response.status_code, 200)
- To verify correct template use:
    def test_list_snack_page_template(self):
        url = reverse('home')
        response = self.client.get(url)
        self.assertTemplateUsed(response, 'home.html')

    # To check you are inheriting from base.html file
        self.assertTemplateUsed(response, 'base.html')
That was it to create a very basic project using Django Framework. You can add as many applications as you want, for each applications you have to create models, views and URL and templates for each view.
References
- https://www.djangoproject.com/start/
- https://docs.djangoproject.com/en/4.0/
- https://developer.mozilla.org/en-US/docs/Learn/Server-side/Django/Models
- https://www.javatpoint.com/django-mvt
- https://www.youtube.com/watch?v=rHux0gMZ3Eg&t=1932s&ab_channel=ProgrammingwithMosh
Additional Recourses
- https://wsvincent.com/how-django-works-behind-the-scenes/
- https://docs.djangoproject.com/en/3.0/intro/tutorial01/
GitHub