Problem domain
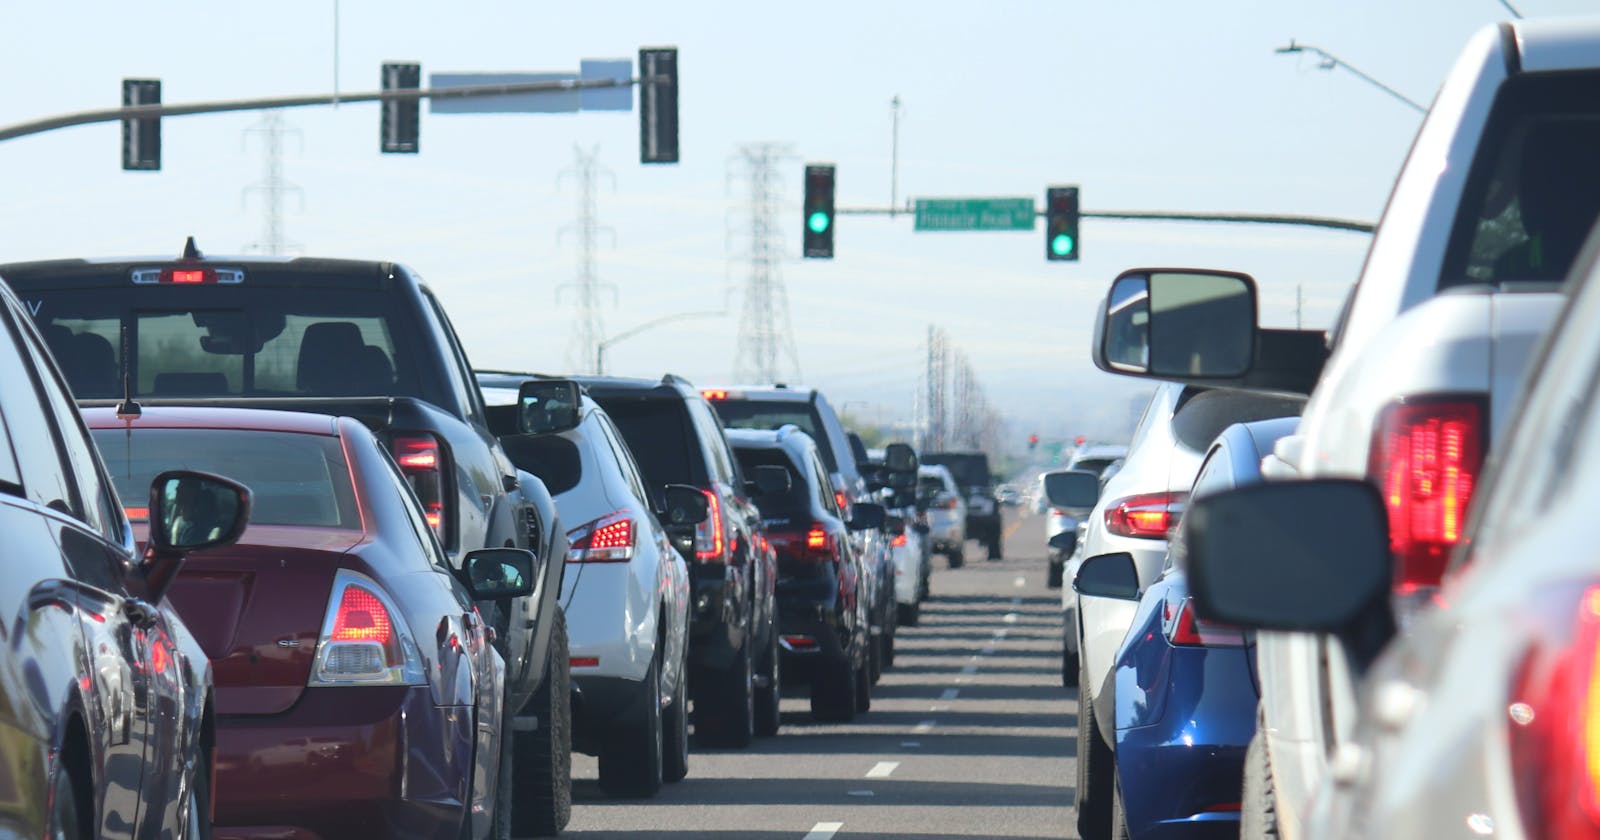
According to a data sample we took from Greater Amman Municipality, the data clearly confirmed the huge problem of traffic we face everyday, especially in peak hours. This problem is partially related to the fact that each traffic light has a fixed green time, which wastes a lot of time and unnecessary traffic congestion. This can be solved by generating a dynamic green time tracking the traffic flow in each street for a specific period of time. So, the goal of our project was to build a create a prediction model for an intersection of 4 traffic lights, to generate a custom green time for each traffic light depending on the traffic flow for each hour of the day in order to help people save time, and avoid traffic congestions as possible.
Overview
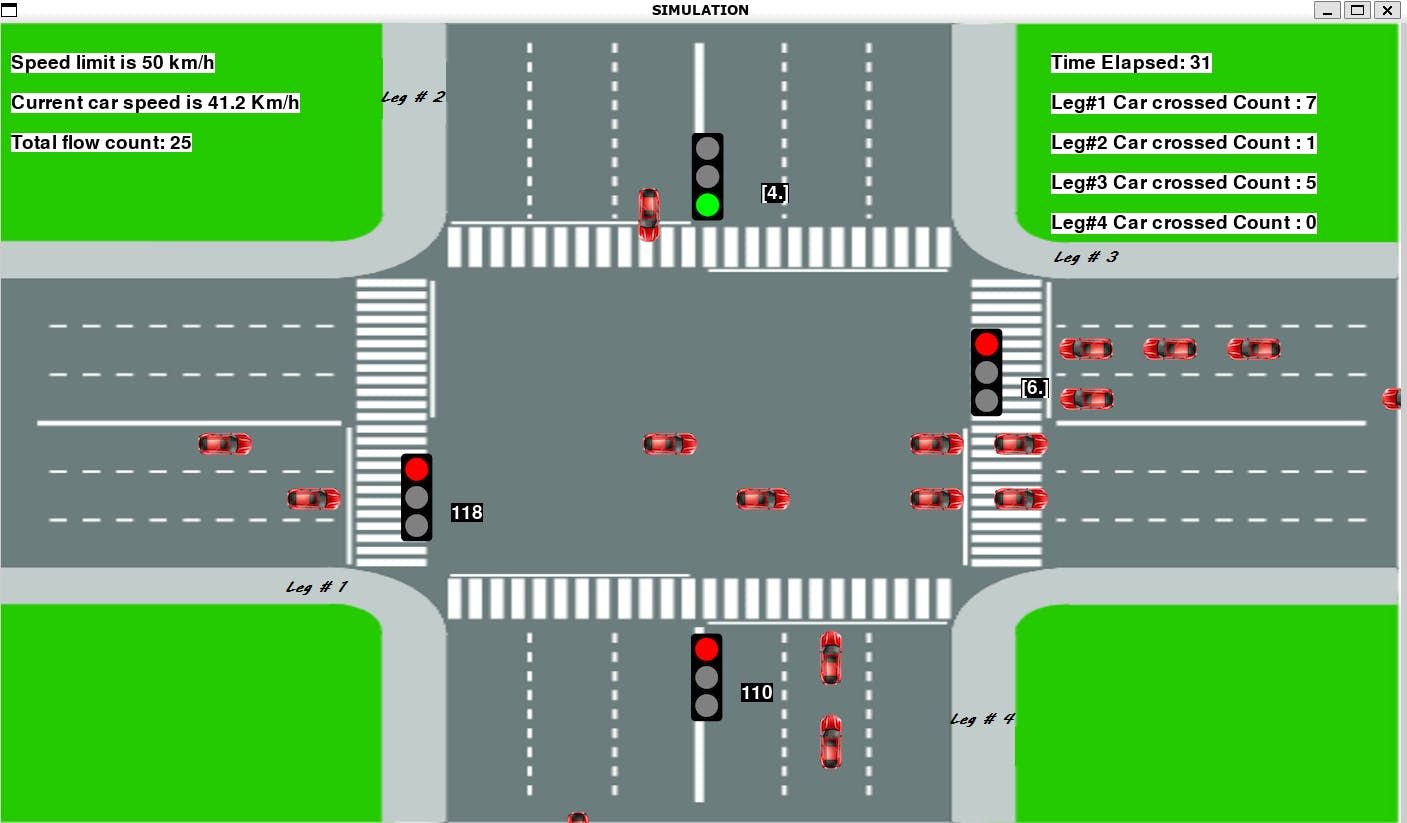
In this blog I am going to share from scratch, the steps of building a Python project using the Pygame library, to achieve building a Traffic system simulation in which the traffic lights predict the green time duration based on number of vehicles for each street in the intersection accordingly.
About Data
The data we used was taken by previous Civil studies of Al-Bashiti intersection in Amman, and included total vehicle number for each hour in Mondays, Tuesdays and Wednesdays of August-2019.
Preparing data
The data we used was provided in an Excel sheet, And we had to clean it and prepare it and then convert it to a cvs file.
In order to prepare the data to use it in the model, we merged the lanes of the same leg, and found the percentage of traffic flow for each one, then we calculated the green time according to the percentage of the flow over the full intersection cycle (120 seconds).
Deep Learning
Building a model
Using Linear Regression machine learning algorithm, we were able to build a model that predicted the green time based on vehicle's flow percentage.
after defining what we want as dependent and independent attributes, we figured that the best approach will be if we divided the cycle on each street leg, and took the percentage for each hour:
first step is to import the needed dependencies:
import numpy as np
import pandas as pd
import matplotlib.pyplot as plt
from sklearn.linear_model import LinearRegression
from sklearn.model_selection import train_test_split
import picke
pickle will help us to save the model to file to use it in our code.
Create a dataframe of the cvs file using pandas, define dependent and independent attributes, and define the test and train variables and algorithm:
df = pd.read_csv("csv file path")
X = df['percentage'].values
Y = df['greentime percentage']
x_train, x_test ,y_train, y_test =train_test_split(X,Y, train_size=0.80,test_size=0.20,random_state=100)
Initialize the model and fit the training data:
model = LinearRegression()
model.fit(x_train.reshape(-1,1),y_train)
- find a coeficeint and an intercipt point with y axis to draw the Red Regression Line:
model.coef_,model.intercept_
- Predict the model and Test training and test accuracy:
y_predict= model.predict(x_test.reshape(-1,1))

train_accuracy= model.score(x_train.reshape(-1,1),y_train)
test_accuracy= model.score(x_test.reshape(-1,1),y_test)
- Save the model to a file using pickle:
 with open('model_pickle','wb') as file:
      pickle.dump(model,file)
- Save the model to a file using Sklearn Joblib:
import joblib
from sklearn import joblib
joblib.dump(model, 'model.joblib')
This is used as a link and is going to be imported then in the code
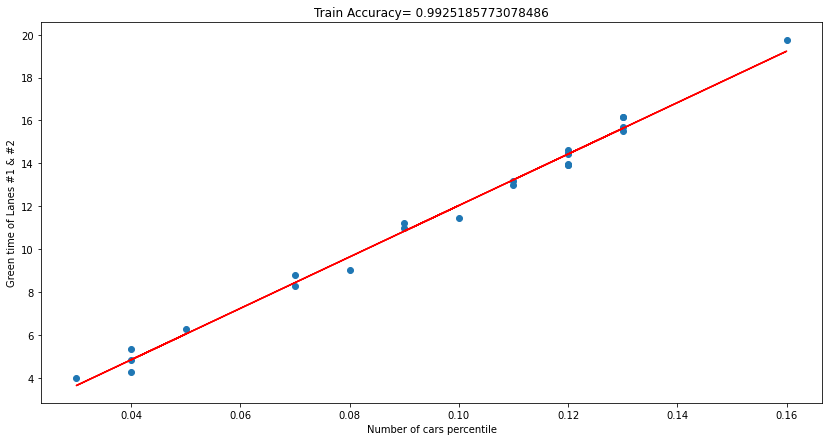
- Plot a graph that represents the relationship between traffic volume and green-time, this was used to show the accuracy between training attributes:
%matplotlib inline
plt.figure(figsize=(14,7))
plt.scatter(X,Y)
plt.xlabel("Number of cars percentile")
plt.ylabel("Green time of Lanes #1 & #2")
plt.title(f"Train Accuracy= {train_accuracy}"  )
m, b = np.polyfit(X,Y, 1)


plt.plot(X, m*X + b,'Red')

Pygame
What is Pygame?
Pygame is a Python library used for creating multimedia applications like games, art, music, sound, videos and many other projects. In this project, Pygame was used to generate a simulation of a signalized traffic intersection.

Basic structure
- The first step is to import all required libraries, and import the linear regression model as well:
import random
import time
import threading
import pygame
import sys


import joblib
- Start with the prediction model variable and then load the model:
# set prediction model for green time signal on / off
prediction_model_mode = True

mj = joblib.load("./ai_traffic_system/model_joblib")
- Define a function that returns the green time prediction as an integer:
def rl_ml_model_timer(flow):
    flow_percentile = np.array(flow).reshape(-1, 1)
    green_time_predict = np.ceil(mj.predict(flow_percentile))
    return green_time_predict.astype(int)
- Define another function to set the limits of green time:
def ml_model_timer(flow):
    flow_percentile = np.array(flow).reshape(-1, 1)
    green_time_predict = np.ceil(mj.predict(flow_percentile))
    # print("i predicted : ", green_time_predict)
    if green_time_predict < 3:
        green_time_predict = 2
    elif green_time_predict > 7:
        green_time_predict = 6
    return green_time_predict
- Create constants that will help us with simulating vehicle's movement and traffic light's timings:
# Default traffic lights timers.
default_green = {0 : 20, 1 : 20, 2 : 20, 3 : 20}
default_yellow = 2
default_red = 120

signals = []
signal_number = 4
cureent_green = 0
currentYellow = 0
speed = 1.62

next_green = (cureent_green + 1) % signal_number
# 1 -> 2 ->3 -> 0 -> 1 -> 2 ...
Car Speed was calculated based on the real live speed in that street which is 40km/hr
- We started working on coordination. We used (Paint App by Microsoft) to locate -by pixles- the signals, timers and stop line coordination:
x = {
    "right": [0, 0, 0],
    "down": [542, 563, 637],
    "left": [1400, 1400, 1400],
    "up": [680, 723, 819],
}
y = {
    "right": [380, 410, 465],
    "down": [0, 0, 0],
    "left": [258, 315, 365],
    "up": [800, 800, 800],
}

vehicles = {
    "right": {0: [], 1: [], 2: [], "crossed": 0},
    "down": {0: [], 1: [], 2: [], "crossed": 0},
    "left": {0: [], 1: [], 2: [], "crossed": 0},
    "up": {0: [], 1: [], 2: [], "crossed": 0},
}
# assigning intersection legs starting from the right hand and CCW
directionNumbers = {0:'right' , 1:'down', 2:'left', 3:'up'}

# Coordinates of signal image, timer, and vehicle count
signalCoods = [(400, 430), (690, 110), (970, 305), (690, 610)]
signalTimerCoods = [(450, 480), (760, 160), (1020, 355), (740, 660)]

# Coordinates of stop lines
stopLines = {"right": 350, "down": 197, "left": 1050, "up": 603}
defaultStop = {"right": 340, "down": 187, "left": 1060, "up": 610}

# gap between vehicls
moving_gap = 25
stoping_gap = 25
vehiclesTurned = {
    "right": {1: [], 2: []},
    "down": {1: [], 2: []},
    "left": {1: [], 2: []},
    "up": {1: [], 2: []},
}
vehiclesNotTurned = {
    "right": {1: [], 2: []},
    "down": {1: [], 2: []},
    "left": {1: [], 2: []},
    "up": {1: [], 2: []},
}

rotationAngle = 3
mid = {
    "right": {"x": 560, "y": 465},
    "down": {"x": 560, "y": 310},
    "left": {"x": 860, "y": 310},
    "up": {"x": 815, "y": 495},
}

count_Leg1 = 0
count_Leg2 = 0
count_Leg3 = 0
count_Leg4 = 0

total_flow_count = 1
totalflowcoods = (10, 110)
- Then we used
pygame.init()function to initialize PyGame . This function calls the separate init() functions of all the included pygame modules. Since these modules are abstractions for specific hardware, this startup step is essential to allow you to work with the same code on Linux, Windows, and Mac:
pygame.init()

simulation = pygame.sprite.Group()
# Sprite is used for rendering.
# Group is an object that holds a group of Sprite objects.
Classes
TrafficSignal class is used to initiate the 4 traffic lights, each with 4 attributes:
class TrafficSignal :
    def __init__(self , red , yellow , green , timer_text):
        self.red = red
        self.yellow = yellow
        self.green = green
        self.signalText = ' '
        # self.signalText -> to display a timer on each signal.
Vehicle class is used to generate vehicle objects to be used in the simulation:
Attributes of Vehicle class:
- lane : Represents the lane that the vehicle moves on.
- direction: Represents the direction in text format.
- x: Represents the current x-coordinate of the vehicle (location).
- y: Represents the current y-coordinate of the vehicle (location).
- crossed: Represents whether the vehicle has crossed the signal or not.
- index: Represents the relative position of the vehicle among the vehicles moving in the same direction. (to calculate the stopping coordinates if its equal to the default stop or it must be calculated based on the relative location).
- direction_number: Represents the direction by number (right takes value of 0 and going CCW).
- image: Represents the image to be rendered.
Methods of Vehicle class
- render(): To render -display- the image on screen.
- move(): To control the movement of the vehicle according to the traffic light and the vehicles ahead.
class Vehicle(pygame.sprite.Sprite):
    def __init__(self, lane, direction_number, direction, will_turn):
        pygame.sprite.Sprite.__init__(self)
        self.lane = lane
        self.direction_number = direction_number
        self.direction = direction
        self.x = x[direction][lane]
        self.y = y[direction][lane]
        self.crossed = 0
        self.willTurn = will_turn
        self.turned = 0
        self.rotateAngle = 0

        vehicles[direction][lane].append(self)
        self.index = len(vehicles[direction][lane]) - 1
        self.crossedIndex = 0
        path = "ai_traffic_system/images/" + direction + "/" + vehicleClass + ".png"
        self.originalImage = pygame.image.load(path)
        self.image = pygame.image.load(path)
The lane and direction together are used to determine the coordination. who to determine the x- coordinates as well as the y-coordinates for the vehicle object? the direction represent the key of the predefined x and y dictionaries and the lane represent the index of the coordinates in the list that nested as value. for example if you initiate and object and call it n , where n = Vehicle(2, 'car' , 1, 'down') , the 2 represent the lane and 'down' represent the direction , if we print the self.x the result will be 697 and the self.y will be 0.
The Vehicle class inherit from the base class for visible game objects pygame.sprite.Sprite. Derived classes will want to override the Sprite.update() and assign a Sprite.image and Sprite.rect attributes. The initializer can accept any number of Group instances to be added to. When subclassing the Sprite, you must be sure to call the base initializer before adding the Sprite to Groups
pygame.sprite.Sprite.__init__(self).
Class Main is the responsible class for running the game:
    # initialization
    thread1 = threading.Thread(name="initialization", target=initialize, args=())
    thread1.daemon = True
    thread1.start()

    # Colours
    black = (0, 0, 0)
    white = (255, 255, 255)

    # Screensize
    screenWidth = 1400
    screenHeight = 800
    screenSize = (screenWidth, screenHeight)

    # Setting background image (image of intersection)
    background = pygame.image.load("ai_traffic_system/images/intersection2.png")
    screen = pygame.display.set_mode(screenSize)
    pygame.display.set_caption("SIMULATION")

    # Loading signal images and font
    redSignal = pygame.image.load("ai_traffic_system/images/signals/red.png")
    yellowSignal = pygame.image.load("ai_traffic_system/images/signals/yellow.png")
    greenSignal = pygame.image.load("ai_traffic_system/images/signals/green.png")
    font = pygame.font.Font(None, 30)

    thread2 = threading.Thread(name="generateVehicles", target=generateVehicles, args=())
    thread2.daemon = True
    thread2.start()

    thread5 = threading.Thread(name="simTime", target=simTime, args=())
    thread5.daemon = True
    thread5.start()

    while True:
        for event in pygame.event.get():
            if event.type == pygame.QUIT:
                showStats()
                sys.exit()

    # display background in simulation
        screen.blit(background, (0, 0))
        for i in range(0, noOfSignals):
    # display signal and set timer according to current status: green, yellow, red
            if i == currentGreen:
                if currentYellow == 1:
                    signals[i].signalText = signals[i].yellow
                    screen.blit(yellowSignal, signalCoods[i])

                else:
                    signals[i].signalText = signals[i].green
                    screen.blit(greenSignal, signalCoods[i])

            else:
                signals[i].signalText = signals[i].red
                screen.blit(redSignal, signalCoods[i])

                if signals[i].red <= 10:
                    signals[i].signalText = signals[i].red

                else:
                    signals[i].signalText = '---'
                screen.blit(redSignal, signalCoods[i])
        signalTexts = ['', '', '', '']

        # display signal timer
        for i in range(0, noOfSignals):
            signalTexts[i] = font.render(str(signals[i].signalText), True, white, black)
            screen.blit(signalTexts[i], signalTimerCoods[i])

        # display the vehicles
        for vehicle in simulation:
            screen.blit(vehicle.image, [vehicle.x, vehicle.y])
            vehicle.move()
        pygame.display.update()
Main()
Functions
- Initialize() -> This function is for initializing traffic lights with predicted values:
**def initialize():**
    if prediction_model_mode:
        L1_percen = count_Leg1 / total_flow_count
        L2_percen = count_Leg2 / total_flow_count
        L3_percen = count_Leg3 / total_flow_count
        L4_percen = count_Leg4 / total_flow_count

        T1_predict = ml_model_timer(L1_percen)
        T2_predict = ml_model_timer(L2_percen)
        T3_predict = ml_model_timer(L3_percen)
        T4_predict = ml_model_timer(L4_percen)

        ts1 = TrafficSignal(0, defaultYellow, T1_predict)
        signals.append(ts1)
        tts1 = ts1.red + ts1.yellow + ts1.green

        ts2 = TrafficSignal(tts1, defaultYellow, T2_predict)
        signals.append(ts2)
        tts2 = tts1 + ts2.yellow + ts2.green

        ts3 = TrafficSignal(tts2, defaultYellow, T3_predict)
        signals.append(ts3)
        tts3 = tts2 + ts3.yellow + ts3.green

        ts4 = TrafficSignal(tts3, defaultYellow, T4_predict)
        signals.append(ts4)

   else:
        ts1 = TrafficSignal(0, defaultYellow, defaultGreen[0])
        signals.append(ts1)
        ts2 = TrafficSignal(ts1.yellow + ts1.green, defaultYellow, defaultGreen[1])
        signals.append(ts2)
        ts3 = TrafficSignal(defaultRed, defaultYellow, defaultGreen[2])
        signals.append(ts3)
        ts4 = TrafficSignal(defaultRed, defaultYellow, defaultGreen[3])
        signals.append(ts4)
    repeat()
- printStatus()
**def printStatus():**
    for i in range(0, 4):
        if signals[i] != None:
            if i == currentGreen:
                if currentYellow == 0:
                    print(
                        " GREEN TS",
                        i + 1,
                        "-> r:",
                        signals[i].red,
                        "-> y:",
                        signals[i].yellow,
                        "-> g:",
                        signals[i].green,
                    )
                else:
                    print(
                        "YELLOW TS",
                        i + 1,
                        "-> r:",
                        signals[i].red,
                        "-> y:",
                        signals[i].yellow,
                        "-> g:",
                        signals[i].green,
                    )
            else:
                print(
                    "   RED TS",
                    i + 1,
                    "-> r:",
                    signals[i].red,
                    "-> y:",
                    signals[i].yellow,
                    "-> g:",
                    signals[i].green,
                )
    print()
- repeat() -> this function is used to repeat generating traffic lights
**def repeat():**
    global currentGreen, currentYellow, nextGreen
    while (signals[currentGreen].green > 0):
        printStatus()
        updateValues()
        time.sleep(1)

    currentYellow = 1

    for i in range(0, 3):
        for vehicle in vehicles[directionNumbers[currentGreen]][i]:
            vehicle.stop = defaultStop[directionNumbers[currentGreen]]

   while (signals[currentGreen].yellow > 0 ):
        printStatus()
        updateValues()
        time.sleep(1)

    currentYellow = 0

    if prediction_model_mode:
        signals[0].green = ml_model_timer(count_Leg1 / total_flow_count)
        signals[1].green = ml_model_timer(count_Leg2 / total_flow_count)
        signals[2].green = ml_model_timer(count_Leg3 / total_flow_count)
        signals[3].green = ml_model_timer(count_Leg4 / total_flow_count)
    else:
        signals[currentGreen].green = defaultGreen[currentGreen]

    signals[currentGreen].yellow = defaultYellow
    signals[currentGreen].red = defaultRed

# set next signal as green signal
    currentGreen = nextGreen
# set next green signal
    nextGreen = (currentGreen + 1) % noOfSignals
# set the red time of next to next signal as (yellow time + green time) of next signal
    signals[nextGreen].red = (signals[currentGreen].yellow + signals[currentGreen].green)

    repeat()
- updateValues() -> this function updates values of signal timers after every second
def updateValues():
    for i in range(0, noOfSignals):
        if i == currentGreen:
            if currentYellow == 0:
                signals[i].green -= 1
            else:
                signals[i].yellow -= 1
        else:
            signals[i].red -= 1
- generateVehicles() -> this function is used for generating vehicle objects
def generateVehicles():

    while True:
        vehicle_type = random.choice(allowedVehicleTypesList)
        lane_number = random.randint(1, 2)
        will_turn = 0

        if lane_number == 1:
            temp = random.randint(0, 99)
            if temp < 35:
                will_turn = 1
        elif lane_number == 2:
            temp = random.randint(0, 99)
            if temp < 35:
                will_turn = 1

        temp = random.randint(0, 100)
        direction_number = 0

        dist = [5, 11, 56, 101]
        if temp < dist[0]:
            direction_number = 1  # north to south (Down)
            count_Leg2 += 1

        elif temp < dist[1]:
            direction_number = 3  # south to north (Up)
            count_Leg4 += 1

        elif temp < dist[2]:
            direction_number = 0  # west to east (Right)
            count_Leg1 += 1

        elif temp < dist[3]:
            direction_number = 2  # east to west  (Left)
            count_Leg3 += 1

        Vehicle(lane_number,direction_number,directionNumbers[direction_number],will_turn)
        time.sleep(1.25)

        total_flow_count += 1
        print("Total flow count: ", total_flow_count)
- showStatus()
def showStats():
    totalVehicles = 0
    print("Direction-wise Vehicle crossed Counts of Lanes#")
    for i in range(0, 4):
        if signals[i] != None:
            print("Direction", i + 1, ":", vehicles[directionNumbers[i]]["crossed"])
            totalVehicles += vehicles[directionNumbers[i]]["crossed"]
    print("Total vehicles passed: ", totalVehicles)
    print("Total time: ", timeElapsed)
- simTime()
def simTime():

    global timeElapsed, simulationTime
    while True:
        timeElapsed += 1
        time.sleep(1)
        if timeElapsed == simulationTime:
            showStats()
            os._exit(1)
Demonstration of the simulation
Team members of the project
Tools
Kaggle Linear Regression model
References
Tenesorflow Turorial AI traffic system
